
Extract
Having ran through the installation procedure a number of times, I decided to write a script to automate it as much as possible. The result was a script that covered about 95% of the installation and took about two minutes to run on a recent built of Raspbian (2015-05-05). As more updates to Raspbian accumulate the run time can increase to 10 or 15 minutes. The script is light on error checking, so is best run on a newly flashed image.
The full step by step procedure that this script automates can be found on the Configuring a System page. For this example I will demonstrate a way to do the initial configuration without plugging the Pi into a monitor and keyboard.
Setting Up the Pi
Download the necessary files
- Download and install Win32 Disk Imager on your PC from Sourceforge:
http://sourceforge.net/projects/win32diskimager/ - Download and unzip the latest Raspbian Image from RaspberryPi.org :
http://www.raspberrypi.org/downloads/ - Download and install the putty ssh client:
http://www.chiark.greenend.org.uk/~sgtatham/putty/download.html - Download and install the angry IP scanner:
http://angryip.org/download/
- Insert your SD card into your computers card slot or use a USB card reader. Take a note of the drive letter allocated to the card (E.g. E:).
- Launch Win32DiskImager and make sure the selected Device matches the SD card location ( [E:\] ). Having the wrong letter here will corrupt that drive.
- Click the small blue folder icon and select the expanded Raspbian image.
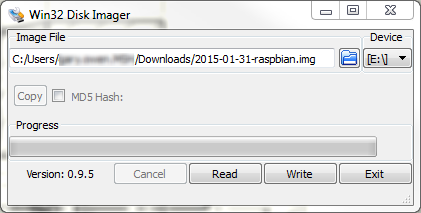
- With everything set click the Write button. You will get a last chance warning about overwriting the drive. Click ‘Yes’ if you are happy to continue.
- Once the image has been written, a small ‘Done’ message box will pop-up. Click the button and then Exit Win32DiskImager.
- Eject/Safely remove the SD card from your computer and insert into your Pi.

Raspbian Configuration and Update.
- Connect the camera to the Pi.
- Connect the Pi to your LAN with an ethernet cable.
- Power it on.
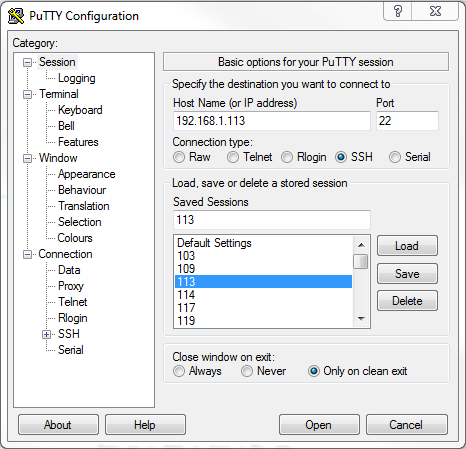
- Run Angry IP Scanner and set the start and finish IP addresses to match your network. Also, in the Tools menu, select “Fetchers…” and add MAC Vendor to the selected fetchers. Click the OK button.

- Click the start button to scan your network. When the results come up, look down the MAC Vendor column for “Raspberr” and then look to the first column to establish the matching IP address. Don’t rely on the hostname column. Depending on your network setup this may show the name of a device that was previously allocated the IP address by DHCP.

- Launch putty and enter the IP address. I like to save the address as a session as I go along to save having to type the full IP address every time. When you are ready to proceed, click ‘Open’ to launch a command window.
- At the prompt login as pi
- The password is raspberry
- The first time you login you will be dropped straight into raspi-config.

- Hit ‘Enter’ on “Expand the Filesystem” to fill the SD card and the ‘Enter’ again to clear the “resize on next boot” notice.
- Use the down arrow key to select “Enable Camera” and hit ‘Enter’. On the next screen use the right arrow to select ‘<Enable>’, then hit ‘Enter’ again.
- Enter “Advanced Options” and then “Hostname”. Give your install an identifiable name.
- Press the Tab key a couple of times to select ‘<Finish>’ and then press enter to exit raspi-config and reboot the Pi. This will stop your ssh session.
- Wait a minute for the Pi to reboot and then restart the putty session, by right clicking in the putty window header and selecting “Restart Session”
- Login again.


Procedure
- Download and extract the script. Case is important.
wget -O - https://goo.gl/NLuFFI | tar zxvf -
- Change to the install directory
cd FPiV
- Run the script
./install.sh
- Let it run keeping an eye out for error messages.
- When all is finished the Pi will be configured with hostapd set to run with 2.4 GHz WiFi using a supported Realtek adapter. The streaming scripts are dropped into the pi home directory.
- Reboot the pi.
- If all is well, when the pi restarts it should start advertising its WiFi connection as Pi_AP.
Get Streaming
- Connect the laptop WiFi to the Raspberry Pi’s Wifi Access Point
- Open a terminal on the Laptop
- run the ./go script on the laptop to update the configuration files on the Pi and set the time and date.
- The go script will leave you in a ssh session on the Pi
- run the ./ustream or ./utee scripts on the Pi.
- Open a second terminal on the laptop.
- run the ./tsplay or ./uts scripts on the Laptop
- The video will start streaming.

Hi
Im trying your aproach to get a low latency streaming.
First, thanks for sharing all the info that you write here, its great 🙂
Well i get the stream running without issues following your instructions but when running i get some issues:
– Seems like there is a buffer of frames anywhere, let me explain, sometimes the client view frames from the past….. It something like if the client its not receiving ok store all the frames and play when the reception its ok.
I don’t really know how to explain, i hope you understand what im talking about and can help me, i tried tweaking the pipeline settings but not change the behavior
thanks !!!
I understand your issue. I have seen this as well with UDP streams. It was my thought that RTSP (Real Time Streaming Protocol) was supposed to drop frames it couldn’t deliver rather than hold them. I haven’t found a away to tweak gstreamer either. I don’t remember having this problem with TCP, but this has increased latency.
Have a look at Befinitiv’s blog (https://wordpress.com/read/post/id/33995305/265). Once I have some more time, I’m going to give his solution a try.
Thanks for answer!
Yep i tried that approach too thinking that it going to loose frames instead keeping it….. but have the same behavior, sometimes instead of forget and loose about “old frames not received” those are storing anywhere and as soon as the connection come back you began to see old frames…..
I also see this openfpv.org with seems to be streamer based but no detail info.
Hello
I think i found the tweak !!
If the Rx its not using raspbian use this pipeline
udpsrc port=5001 ! application/x-rtp, media=(string)video, clock-rate=(int)90000, encoding-name=(string)H264,payload=96 ! rtpjitterbuffer ! rtph264depay ! h264parse ! avdec_h264 ! videoconvert
Note “rtpjitterbuffer”
http://gstreamer.freedesktop.org/data/doc/gstreamer/head/gst-plugins-good-plugins/html/gst-plugins-good-plugins-rtpjitterbuffer.html
Good Find! I’ll have a good read through the documentation hopefully soon.
The “drop-on-latency and latency” elements looks useful, but I do note that “This element acts as a live element and so adds “latency” to the pipeline.”
Yes sure that using this put some “latency” on the stream….. i have not tried yet to tweak the parameters to see if i can improve the latency but at least im not seeing “frames from the past” 🙂
I have to dig more, now im putting the pipe thought a shader to view the signal on oculus rift
Thanks for your effort putting all this info together !!!
Let me know how you get on. I’ve just received some Headplay goggles which have an hdmi input. I’ve got 5GHz wifi working, but am struggling with range.
I will post here my progress.
What devices are you using for 5ghz? What range are you getting, move the video to 5ghz will be super nice in order to use 2.4ghz radio. I have two edimax ac600 to test
Yesterday i tested a dji digital link and my surprise was the latency, manufacturer claims for 80ms but its more on the 200ms line
Did you know that you can use a shader directly on gstreamer? I told you this for the glasses because if they had lenses you are going to need a barrel shader
Alsp found this similar project, has a nice ui to adjust the camera settings
http://www.swat-drones.de/