For some reason my Raspberry Pi has stopped working at the field. Everything is fine on the bench, but as soon as it’s strapped to the the plane, the Laptop can’t connect. Without a monitor and keyboard at the field, I can’t diagnose the problem.
I have two thoughts on the matter.
1. The case and board are distorting due to the rubber bands, preventing the SD card from getting a full electrical connection. I’ve made a platform for it to sit on which should hold everything flat.
2. Although the Pi is powered from a 3 Amp BEC, there is an internal limit to how much current it can supply to peripherals. I have added the external amplified antenna to the Ultimate GPS Breakout and it maybe the extra current draw is causing problems.
To remedy this I have modified the wiring harness so that it can be powered directly.
While on the subject of the amplified antenna, I have also shortened the cable from its original 5 metres to something more manageable and removed the heavy permanent magnet from the housing.
Hopefully these measures should get things working again.
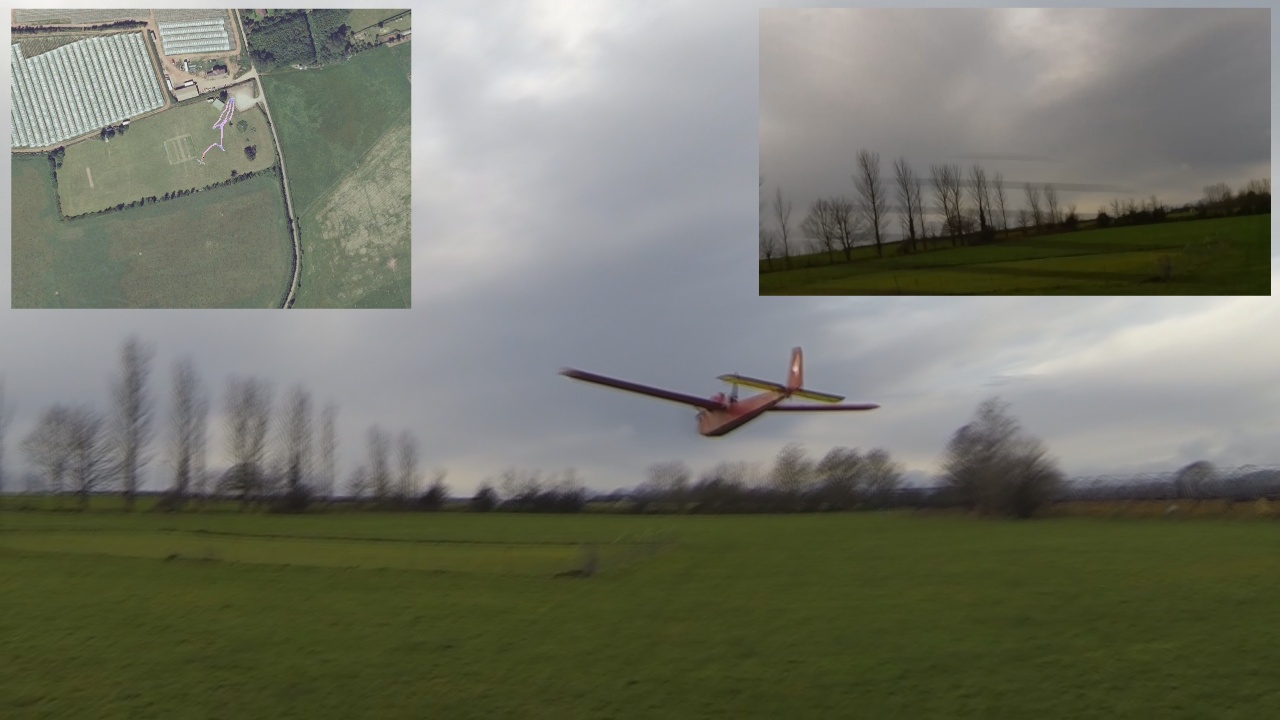
Only a couple of days after my first flight, we had another sunny day, so I took the opportunity to go flying. I hadn’t changed the setup from the first flight, but wanted to try pushing the range out further. I found after the flight that the GPS had never achieved a lock and no track was recorded. Reviewing the on-board camera footage, I found some clear landmarks that could be used to calculate a new maximum range of 350 metres. This is about as far as I can fly line of sight with this airframe.
While the flight was performed line of sight, I did manage a couple of glances at the laptop screen with the headcam to show the stream was still running.
Setup
The computer and aircraft setup was the same as for the first flight. I pointed the camera down a bit further so more ground and less sky was recorded. Unfortunately it also meant more propeller was recorded. I did move the rudder push rod in one hole on the servo to reduce its authority under power. My old Futaba Attack 4 channel radio doesn’t have dual rates.
The Flight
While still blustery, the wind was not as strong as for the first flight. I was able to push the distance out further and a couple of quick glances at the laptop showed the stream was still running. Towards the end of the flight, I tried a couple of loops and then flying through the (bigger) gaps in the trees. You can’t hear it on the video, but I did clip a couple of small branches.
Results
After the flight it was disappointing to find that the gps had never got a lock and no track had been recorded. Luckily, the on-board camera had recorded two very distinctive landmarks during a turn which could be used to triangulate it’s position.
The first was a hedge running south.
The second was the line of trees next to the playing fields.
Locating these landmarks in Google Earth allowed me to measure the maximum range as 350 metres.
This distance is about my limit for line of sight flying with this airframe.
While editing the video I became aware that the Raspberry Pi camera and the GoPro headcam were running at slightly different rates. I had synced the start of the two videos streams at the point the propeller started turning to within one frame. After the six minute flight the Raspberry Pi was about one second behind the GoPro. You can see this as the plane passes the last tree.
While not a big deal it does make it a pain to edit the two streams in parallel.
Conclusion
While not a totally successful flight, I was able to establish a new maximum streaming range of 350 metres. The next step is to work out a way to record the stream at the laptop end.
Having established from my tests with gstreamer that a low latency video stream over WiFi could be achieved from the Raspberry Pi and that a usable range could be achieved, I decided to mount the system on an aircraft for some line of sight testing. In order to extend the range test, I added an Adafruit Ultimate GPS Breakout Board.
The results were mixed: the video stream remained consistent throughout the flight although with higher latency than expected and the GPS accuracy was poor. The reasons for the problems have been identified and fixed, so the overall results are still promising.
Computing Setup
To save booting from a thumb drive every time, I resized the Windows partition on my laptop and installed Lubuntu to the end of the hard disk. This was fine for a while, but then an update to gstreamer made it impossible to install the bad and ugly plugin packages together. In the end I gave up on Lubuntu and installed Arch Linux on both the Laptop and the RPi. The driving force for this was that version 1.2 of gstreamer was available on both platforms. Having never used Arch Linux before it took me most of the Christmas holidays to get everything running properly.
To save a bit of weight I replaced the Raspberry Pi model B with a model A. The SD card can be moved between the two boards without changes. An Adafruit Ultimate GPS Breakout board was added to extend the range testing. This was connected to the Pi’s UART pins. I didn’t solder on the battery holder for the real time clock.
The board was mounted in a bright raspberry pink case, so it would be easier to find should it become detached from the plane. I trimmed the plastic around the SD card slot so the camera cable could be run out above the card. The camera was mounted in a PiBow holder and bolted to the case. As the PiBow holder clips together, I glued the joints to secure everything.
Finally, I created some scripts to get everything configured and talking.
Aircraft Setup
I retrieved my old “Sorcerer” slope soaring trainer from the loft. This design dates from 1969, although mine was built during the eighties. It’s not pretty, but it is tough. The radio system was a Futaba Attack 4 channel system on 35MHz and so wouldn’t interfere with the 2.4GHz WiFi signal. As it hadn’t been used for 25-30 years, I replaced the transmitter battery, but apart from that everything worked fine.
As this was a glider, I built a power pod from birch and lite plywood to sit in place of the hatch. Having the motor up front put the centre of gravity in the right place without adding additional weight. The flight battery was replaced with a 1300 mAh LiPo which powered the receiver and servos through the ESC’s Battery Eliminator Circuit (BEC). I used a propeller that had previously been used on a multirotor that was well balanced.
The Pi was powered by a dedicated 5V 3A BEC connected to the LiPo battery’s balance connector. Everything was held on with rubber bands.
The Flight
The first launch turned into a powered glide. I hadn’t allowed enough throttle for the extra weight and drag. The second launch had it climbing and zig-zagging up the field. The Sorcerer has a huge rudder on a fin that is little more than a post. With the added prop wash over the rudder, turbulence from the everything strapped on top of the wing and the gusting wind, it was difficult to keep it straight and smooth. Once some height had been achieved and the throttle reduced everything settled down. I flew for about 5 minutes doing big circuits of our local playing field, before bringing it in to land.
Results
As I was flying without a spotter, I didn’t look at the laptop screen until the flight was finished.
After retrieving the glider, I found the stream was still running which was a good start. I hadn’t checked the latency with the new system before the flight, so it was disappointing to find it was running noticeably higher than I had achieved in my earlier tests. I still had the original Raspian SD card and Lubuntu Thumb drive and a quick check showed that that setup still ran with low latency. Research suggests the higher latency is due to incompatibilities between Arch Linux and the particular Intel chipset in the laptop. It could also be that the hard drive speed is slower than the thumb drive, especially as the linux partition is at the end of the available drive space.
The next check was the GPS track. I used WinSCP to get the video and gpx files off the RPi. I found a really useful website that animated the track in real-time: www.gpsanimator.com/StarTraX. I did a video capture from the screen using Applian Replay Video Capture which I then synced with the on-board and head camera footage in Sony Movie Studio 11. As well as producing the video, this also allowed me to get frame grabs to calculate the gps error.
The animation showed the track jumping all over the place. If it is to be believed, most of the flight was spent on the wrong side of the trees and I was flying behind where I was standing. When synchronized with the video it is easy to see the inaccuracy.
Here is an example. This image shows the glider crossing left to right in front of me. In the bottom right hand corner is a tree.
Now look at the GPS track. I’ve marked on where I was stood, the position of the tree and the observed track. The recorded track shows aircraft moving right to left, well behind me and over a small wood. The error is about 60 metres.
An even clearer example is the landing. The error is about 130 metres. Seeing as the current maximum tested range is only 240 metres, this is not good. After being stationary for a little while, the GPS eventually caught up.
I’ve got a Crius CN-06 V2 U-Blox based GPS which has a much larger antenna as the picture below demonstrates. I also have the high gain remote antenna for the Ultimate GPS breakout, which is the same size as the Crius. Finally, I’m going to add the real time clock battery holder, which should improve the warm start times. At least one of these should improve things.
Conclusion
While there were issues with the latency and the GPS, as a first flight the main purpose was achieved. The streaming from air to ground worked and remained stable throughout the flight. There is certainly enough promise to keep the project moving forward.
Inspired by the results from the gstreamer latency testing, I wanted to check the usable WiFi range before getting airborne.
With my portable power setup, I took a trip to our local playing field one lunchtime and set the Raspberry Pi on the roof of my car in the car park pointing it towards the far end.
Everything was switched on, the WiFi link was established to the laptop and the stream started. I used the Strava app on my phone to record the GPS track. Finally I started walking up the field monitoring the stream to check for drop-out. At the far end of the field, I still had a solid stream. I could have gone further, but the Raspberry Pi would have been out of sight where anyone passing could have just walked off with it.
Feeding the GPS output into Google Earth gave a distance of 212 metres (232 yards).
Based on this encouraging result, the next step is to load the Pi+Camera onto an aircraft.


You must be logged in to post a comment.